Friday, December 22, 2006

Christmas Star Decorations!

Happy Festive Season everyone!


I made these little stars for the christmas decoration swap I was telling you about. They're really easy, even for those of us who are sewing-in-a-straight-line challenged. I posted the pattern up over in the side bar. If you want to print it out at the correct size for some reason you'll need to download it to your desktop and then print, rather than print from the link. My process went something like this:

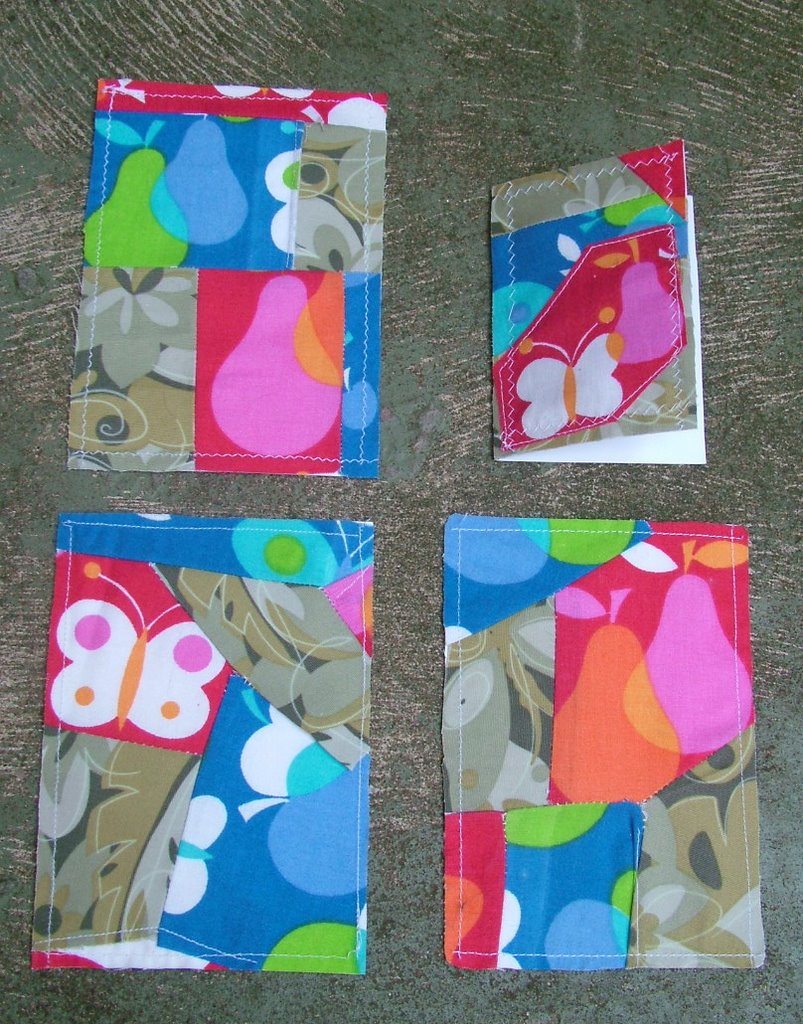
1. Cut out shape (yes, I know, der.)
2. Pin shape to two pieces of fabric, with their right-sides facing (each other).
3. Cut fabric around edges of shape. You should now have two fabric stars. Keep their right sides facing.
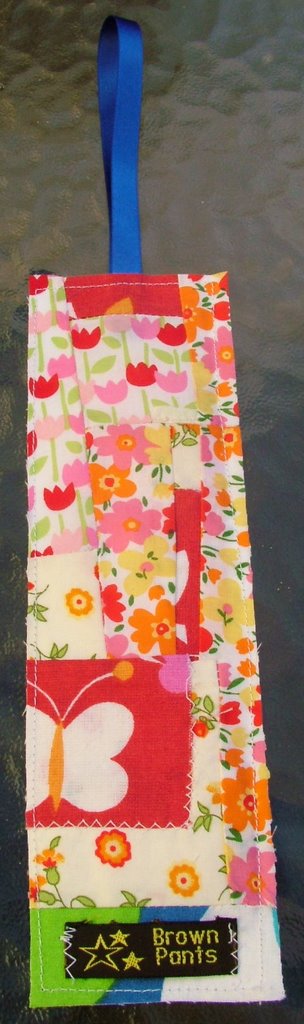
4. Take a piece of ribbon (about 18cm) fold it in half and place it between the two pieces of fabric of the top point of the star. (like the cheese in a sandwich, unless you're vegan and then it can be lettuce). The two ends of the ribbon should be poking out between the fabric at the top of the point. Pin it.
5. Pin the fabric together to secure it
6. Sew closely around the edges of the star, leaving a gap on the 'inner leg' of one of the bottom points. This needs to be big enough to turn the fabric right side out through. Make sure you catch the end of your ribbon at the top point and not in the edges (the cheese will try and escape, lettuce not so much).
7. Snip about five little cuts into each of the corners of the star (not the points, the inside V bits). This helps stop puckering when you turn it.
8. Turn the star right side out through the unsewn part of the seam. It may help to pull gently on the ribbon to bring the top point through. I poke the rest of the points with a pencil to get them in to shape (it's a very serious business this).
9. When you're happy with the shape, iron it. Don't skip this part or your mum will pull faces and say things like 'I don't know what I did wrong that you missed the ironing gene.' (When the correct answer is: 'Oh my, what a splendidly clever daughter you are'.)
10. Stuff it. Stuff it good. Pillow or toy stuffing are best, although feel free to experiment!
11. Sew closed the open seam. I'm lazy and use the machine, but can see the sense in hand-sewing.
12. Hang it where you will get appropriate amounts of acclaim :)


I'm off on a little blogging break over Christmas and New Year, but I'll *see* you all again in early January. Have a fabulous Christmas and New Year. Hopefully the end of 2007 sill see the world a more peaceful and humane place than the end of 2006.

xxx

Tuesday, December 19, 2006

Please excuse me while I fiddle with the layout. It appears I can take things apart but am not so good at putting them back together.

OK. I think I have that sorted now. Let me know if you're having any problems and comments are welcome :)


Saturday, December 16, 2006

Bells' hand towel

Now that she's received it safe and sound, I can share the hand towel I made for Bells.


It's based on this pattern, but I made a few alterations to both simplify it and to suit the yarn I was using.

If you're interested in making it, the pattern goes something like this:

Using 8ply cotton on 4mm needles Cast on 64 stitches using colour 1.

Knit 3 Rows

Using colour 2
K7 *P2,K4* repeat to last 3 stitches, K3.
K3, P4 *K2, P4* to last 3 stitches, K3.
Repeat these two rows 3 more times. This should give you 8 rows total in colour 2.

Change to colour 1, repeat above 8 rows.

Change to colour 2, repeat above 8 rows.

Continue in this fashion until you have 8 stripes (excluding the knit stripe along the bottom in Colour 1)

Change to colour 2.
1: K2Tog across the row (32 sts)
2: K across row
3: K2Tog across the row (16 sts)
4: K across row
5: K2Tog, k across row to last 2 sts, K2Tog (14 sts)
6 - 24: Knit across row (so knit 19 rows)
25: K2Tog, k across row to last 2 sts, K2Tog (12 sts)
26: K6, yo (for buttonhole), K6 (13 sts)
27: K across row
28-30: K2Tog, k across row to last 2 sts, K2Tog (7 sts)
Bind off.

Place and sew button in appropriate place.

If you like you can give it a light steam block. You also don't need to cut the cotton at the end of each section, you can carry or twist it up the side. It may mean that there's a litle but of alternate cotton running up one side, but I don't think this looks too messy. And it's easier than sewing in ends!

This comes out as a bit of a loose weave, depending on your tension, so you could knit two strands together if you want to make it a dense fabric.


This one was made using 8ply Heirloom cotton in purple (675) and lime green (678), purchased from here for the aussies.

Enjoy :)

Thursday, December 14, 2006

Waiting by the mail box

There's been lots of swap business happening lately and I've had a great time putting together parcels for some new blog-friends. I've also given strict instructions that if a Parcel arrives at home I am to be called at work and informed. Interestingly enough I have been having 'early' days when there's a package waiting at home :). I got this in the mail from Bells today:

Aren't the colours fabulous! We had a little dishcloth swap, but this is too good for my dishes, so it's now my new favourite facewasher. I broke the rules a little for my parcel to her, but I'll have to wait until she receives it to explain. Thanks Bells, you're a great swap buddy.

I've also been doing a little Christmas Decoration Swap with some SnB mates. This is great fun, but unfortunately I was organising it so it was kind of left to the last minute (no surprises there.) We ended up having a little secret santa decoration swap and I scored big time! Check these out:


Pretty, aren't they! I got a whole bunch of them. My Christmas tree is in the front room though and I like them so much I wanted to look at them all the time. I ended up stringing them up and putting them in the lounge room.


I can't share any secret santa Christmas Decoration Swap info yet either. Soon though!

On a completely different note, I *accidentally* purchased Regina Spektor's new album the other day and I'm loving it. It made me think about what kind of music other people craft to. Sadienadlance and I do some 'mixed tape' swaps every so often (and pursuant to me investigating copyright infringement) I'd be keen to do a craft music swap if anyone is interested. I should possibly check out the copyright situation before suggesting a swap, but if you're interested, or if you can inform me of said copyright scenario, let me know :).

Sunday, December 10, 2006

Who needs hallmark

There's been some serious craft ADD going on around here lately. The back step has been set up for knitting: morning coffee, most meals, phone calls and any trip between the front of the house and the back of the house taken via the 'scenic route' leads to a couple of rows on whatever knitting project's closest. The couch has been overtaken by crochet: a good song, the news and conversations with Mr BP have all lead to a bit of SC, HDC, DC and the odd TC. Mind the scissors. The dining room is the sewing room: time on the computer, retrieving a book or pattern, reading* or movement from the knitting to crochet zone has lead to a brief interlude with the sewing machine (I reckon sewing is definitely the messiest craft, the room looks like a quilt exploded.)

No pictures yet though, everything's top secret Christmas or Swap projects. But I can show you these:


I get cranky and the price of cards so I never buy them unless they're unusual or funny (like the ones with the pictures from old knitting patterns on them and a sarcastic statement inside. But they're the exception). These make a good use of old scraps of fabric.

I just sew a whole bunch of scraps together, iron it, pin it to a piece of cardboard I want to cover, sew it around the edge of the cardboard and then cut off the excess fabric. Voila! I reckon it makes a pretty cute bookmark too :)


*This is excellent. If you've read The Secret River I would recommend this. I was a little skeptical of the concept, but I really enjoyed it.

Saturday, December 02, 2006

And finally: pictures

Ahhhhhhh. Take a deep breath. Feel the relief.

Shall No. 2

Now I believe I left you about to begin the drive to the wedding with quite a bit of one shawl left to knit and block? (That's not really a question, I know that's where it was up to, more for dramatic effect I guess...did it work?) Well the car knitting didn't go so well. I got about two repeats done in a six hour drive and by the time we got there I was seriously starting to doubt that my glorious plans would be achieved. But I persevered. I knitted while MrBP got a hair cut. I knitted while I was having a beer with mum and dad. I knitted while talking to my sister about her latest boy drama (The knitting really helped here. Although at some stage I was concentrating on the knitting too much and just started to say everything that was in my head, including 'Christ girl, how many boyfriends do you need? I can't keep up with them. I'm calling them all Colin from now on.' Luckily she thought it was amusing rather than insulting). I knitted on the drive to the restaurant and the way home.

Shall No. 2

And, finally, I cast off while my dress was being hemmed. I blocked it that night, put a little fan on it for a while, and prepared to leave it there for someone else to collect and bring to the wedding. But something unexpectedly good happened (hallelujah!) It was so hot overnight that it actually dried. I was shocked! The others had taken two days to dry. Finally something was going right! The curse was lifting!

Shall No. 1

We drove to the wedding venue, set of shawls complete. I finally started to think about a wedding speech. But I couldn't settle down, it was too hot to write.

Shall No. 1

Then I clicked...it's hot. Way too hot for shawls. I'd made a flippant comment to MrBP that wouldn't it be funny if it was too hot for shawls? Hardy-hardy-har!
Not.

Shall No. 3

But, like everything on the day, the whether was perfect. It was overcast but warm, and it cleared for the ceremony itself, but not enough to be uncomfortably hot. Then as the sun started to go down it started to get a bit chilly. Shawls were fetched, complementing the dresses better than I could have predicted. It was really lovely.

Shall No. 3

I fell like i'm a bit lost knitting wise now though. I've usually got project after project lined up but I've been so focused on these shawls that I just haven't thought about it. I have a couple of swaps i'm working on which i'm enjoying, but nothing other than that. Anyone got any suggestions? I don't mind a bit of a challenge now and then ;)

Shall No. 1, on holidays.

Thanks so much to all of you wonderful bloggers that sent me good vibes. You rock! It constantly amazes me that people I don't know would be so generous and supportive. I'm trying to think of ways that I can say thankyou, but for now just know that i'm truly grateful. Go shout yourself a beer from me :)

Pattern: All are Forest Canopy Shoulder Shawl, by Susan Pierce Lawrence. If you're looking for a beginner lace project I would definitely recommend this one, and have before! It's a really beautiful pattern that's easy to memorise.

Yarn: Shawl No. 1 is Colinette Tao in Madras. I had 3 skeins and had about half a skein left. This stuff is expensive, but it's 100% silk, variegated, and worth it :)

Shawl No. 2 is Lorna's Laces Lion and Lamb in Lakeview. I used about a skein and a half.

Shawl No.3 is Heirloom Cashmino, 7 skeins. I ran out of yarn casting this off! Arhhhhhhhh!

Needles: Shawl No 1 5mm Addis.

Shawls No 2 & 3 6mm bamboo circular

Modifications: Nope, the instructions are excellent and clear. The only thing I did was make them a little bigger. Shawl number 1 was 12 repeats. Shawl number 2 was 13 repeats. Shawl number 3 was 15 or 16. It's a great size. Big without being huge.

I couldn't blog about shawl no. 3 because I was being a bit naughty and didn't tell the bride about it (and made her possibly feel a little left out...I just wanted it to be a nice surprise!) I managed to be (slightly) organised and made this a month or so ago. Not everything's last minute!